Manually Change App Name
In main directory Go to app -> src -> main -> AndroidManifest.xml
Change YOUR_APP_NAME to your app name
Androi:label=""
PHP Setup
Requirements
- Important
- Required Admin Panel
- Required Subdomain configuration for the setup panel
- PHP >= 8.0
- MySQL >= 5.6
- Apache HTTP server
- OpenSSL PHP Extension
- Enable Output_buffering in Php.ini File
Installation Instructions
- Make Sub domain
- subdomain.yourdomain.com
- Unzip the Zyntra Admin Panel 1.0.zip file and ONLY use the extracted /root folder and upload in below directory based on your server
- In Linux
- Path: var/www/html/
- In cPanel:
- Inside File manager -> Path: public_html/
- Create the database on your server
- Import Zyntra 1.0.sql file in created database. ( Note : Only necessary for those client, who is setup project first time. )
Already imported Zyntra 1.0.sql
Admin Default credentials
Email    : admin
Password : admin@123
1. Change Database settings
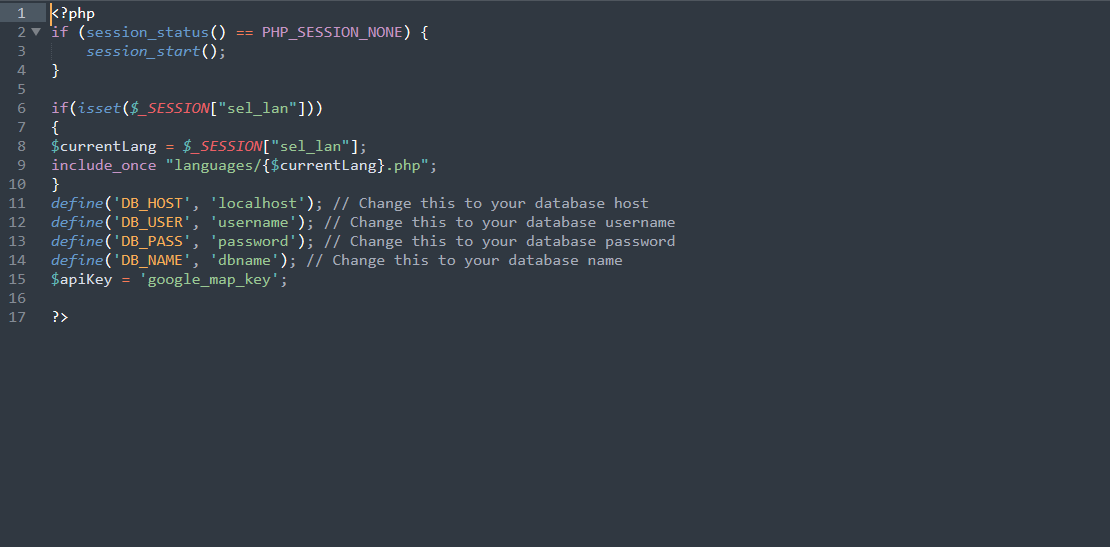
For database settings, open the inc/config.php file with a text editor and set your database settings.
Enter database name, database username, database password and the host details
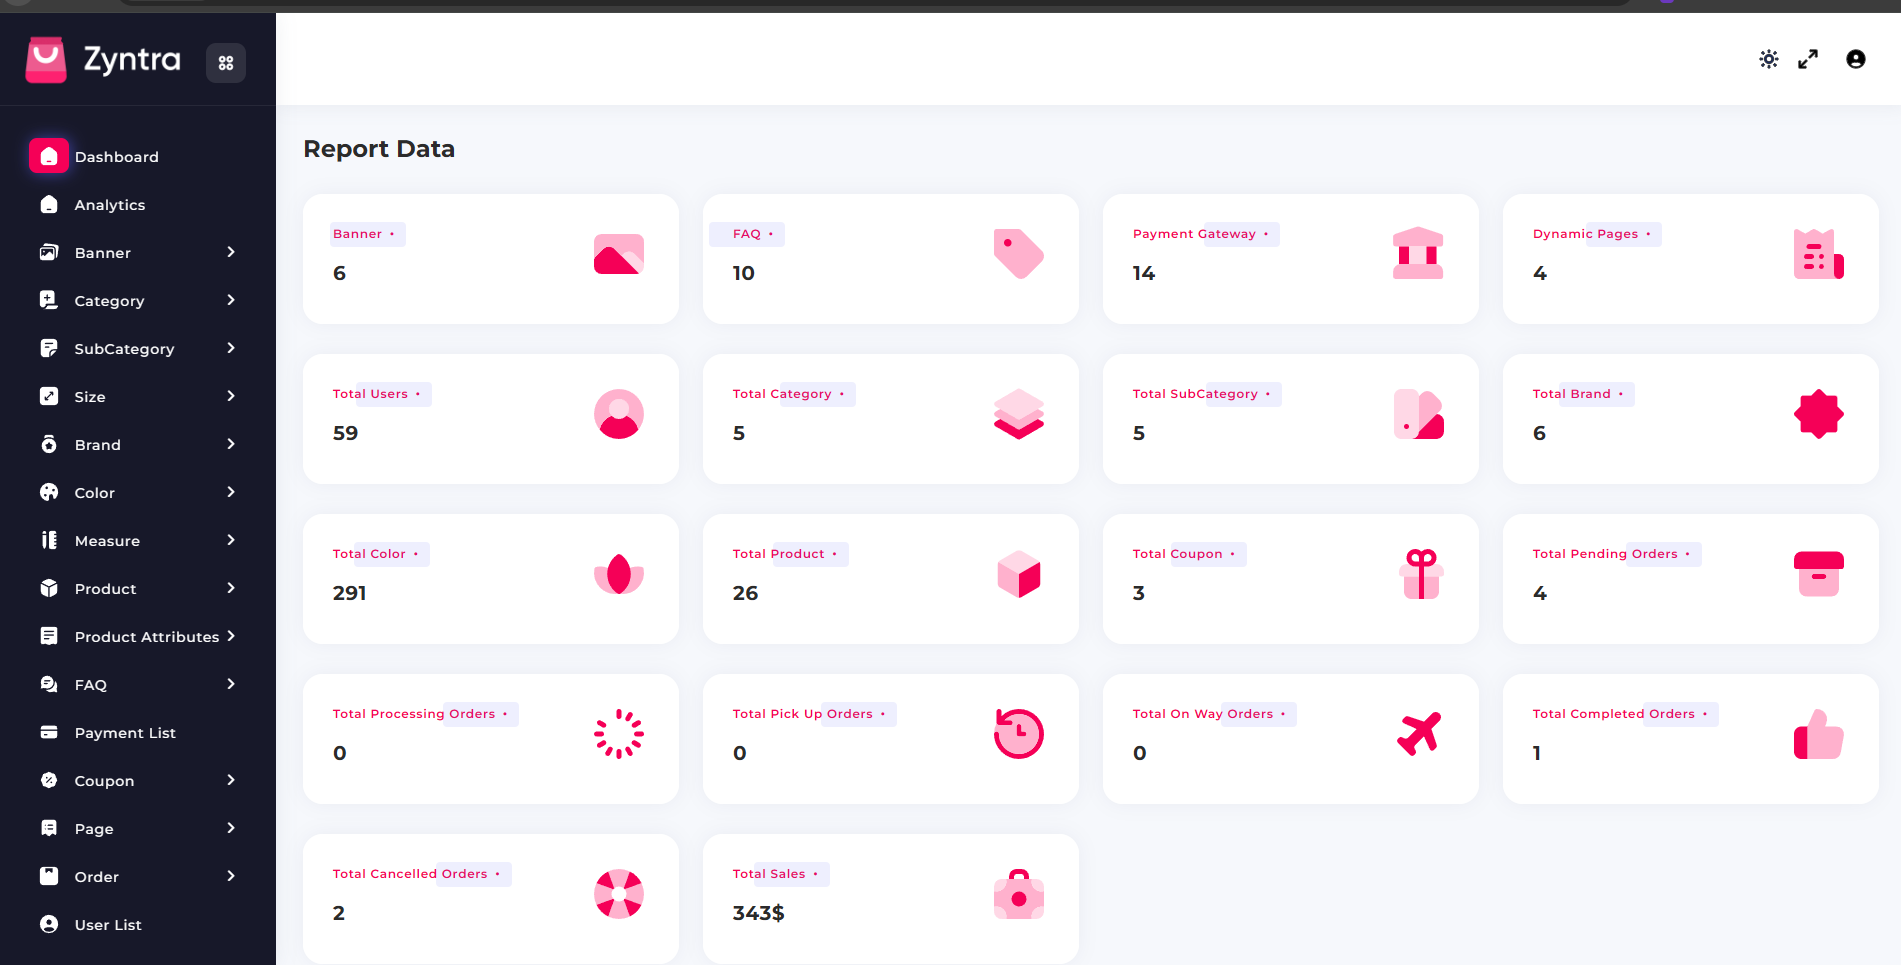
1. Quick Start Admin Menu Guide
- Flexible Pickup & Drop: Send or receive anything from one location to another—keys, parcels, or documents—delivered safely to your chosen address.
- Shop from Any Local Store: Buy from your favorite neighborhood store, even if they’re not online. Choose a store, add your items, and we’ll do the shopping for you.
- Real-Time Product Confirmation: Get live pictures of the items found in-store and approve or reject them before purchase.
- Pay Only After Approval: Finalize your payment only after you’ve reviewed and confirmed your selected items.
- Live Order Tracking: Watch your delivery partner's real-time location from pickup to drop-off directly within the app.
- Custom Wishlist: Save items you wish to purchase later or keep track of out-of-stock products for future orders.
- Distance-Based Delivery Charges: Know your delivery fee upfront, based on the exact distance between the store and your location.
- Easy Address Management: Add and manage multiple delivery locations like home, office, or other saved addresses with ease.
- Secure Payments & Order History: Enjoy encrypted payment options and access all your past orders in one place for convenience.

Base URL Configuration
- Important
- Please do not change anything in the flutter code. If you use PHP backend you only need to set the base URL otherwise set only the puchase code.
With PHP Backend
Change Base URL & Onesignal App ID For App
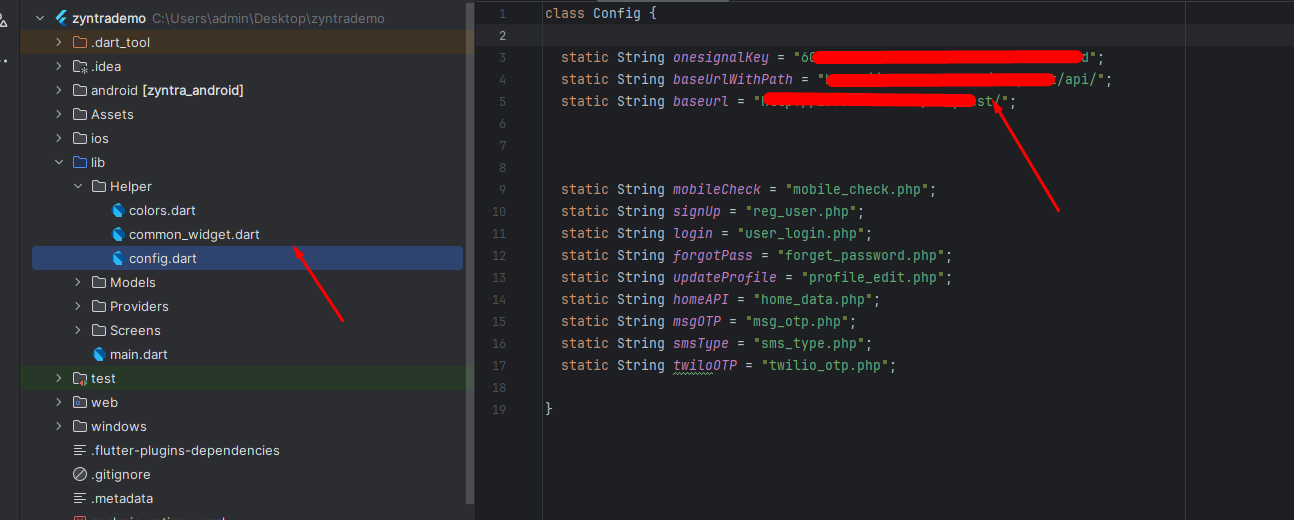
In Main directory goto the lib->api folder and open config.dart file and change your BASE_URL value.
static const String imageURLPath="ADD YOUR BASE URL";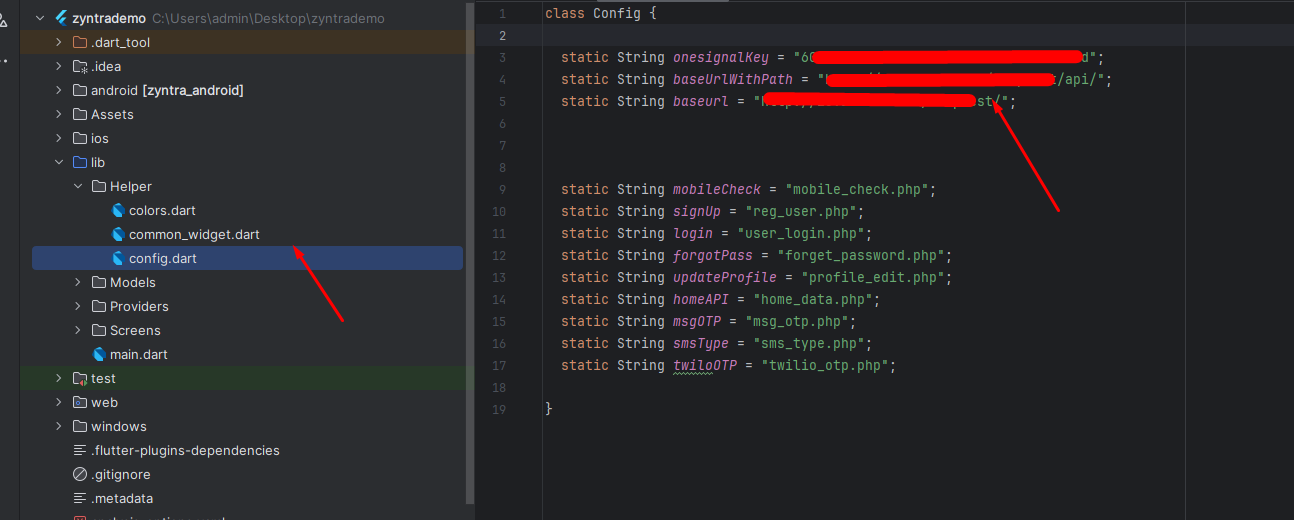
How to get Base URL
Open your Admin login page and copy the URL.
How to set Onesignal App ID
Firebase Configuration
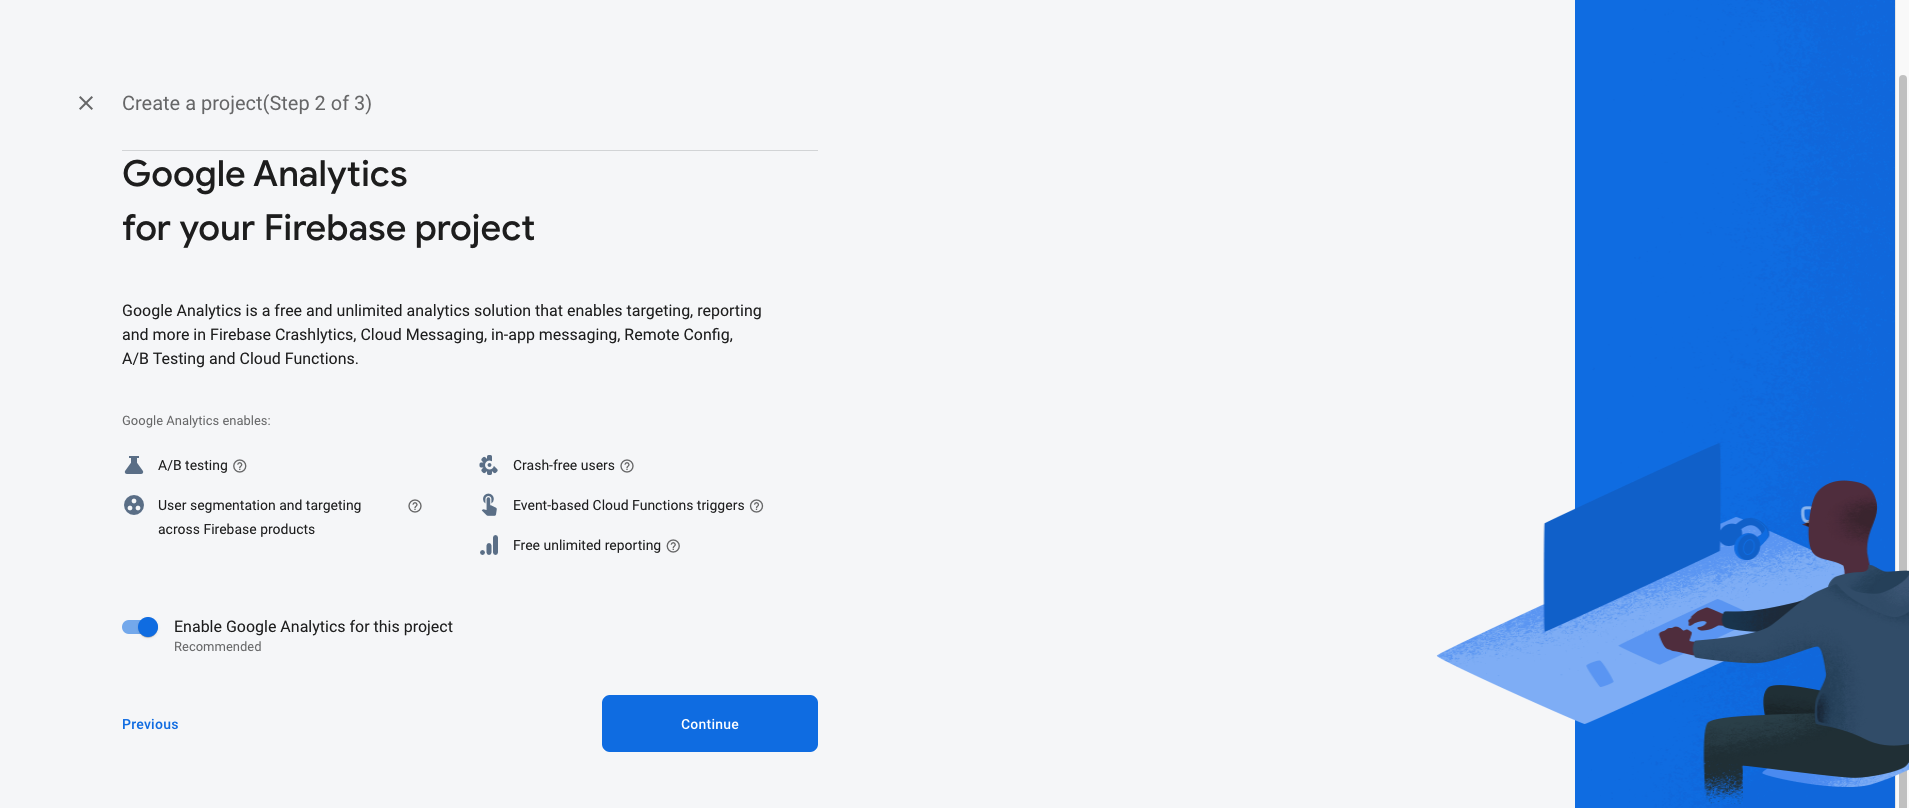
Create a Firebase project
Before you can add Firebase to your Flutter app, you need to create a Firebase project to connect to your app. Visit Understand Firebase Projects to learn more about Firebase projects.
- Warning
- If you're releasing your Flutter app on both iOS and Android, register both the iOS and Android versions of your app with the same Firebase project.
Visit for more information on how to setup for Android
Visit for more information on how to setup for iOS
Register your app with Firebase
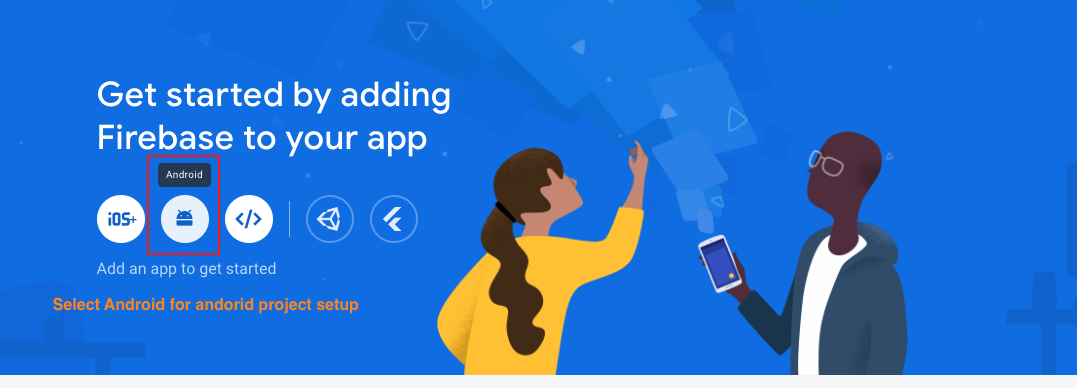
- In the center of the Firebase console's project overview page, click the Android icon to launch the setup workflow.
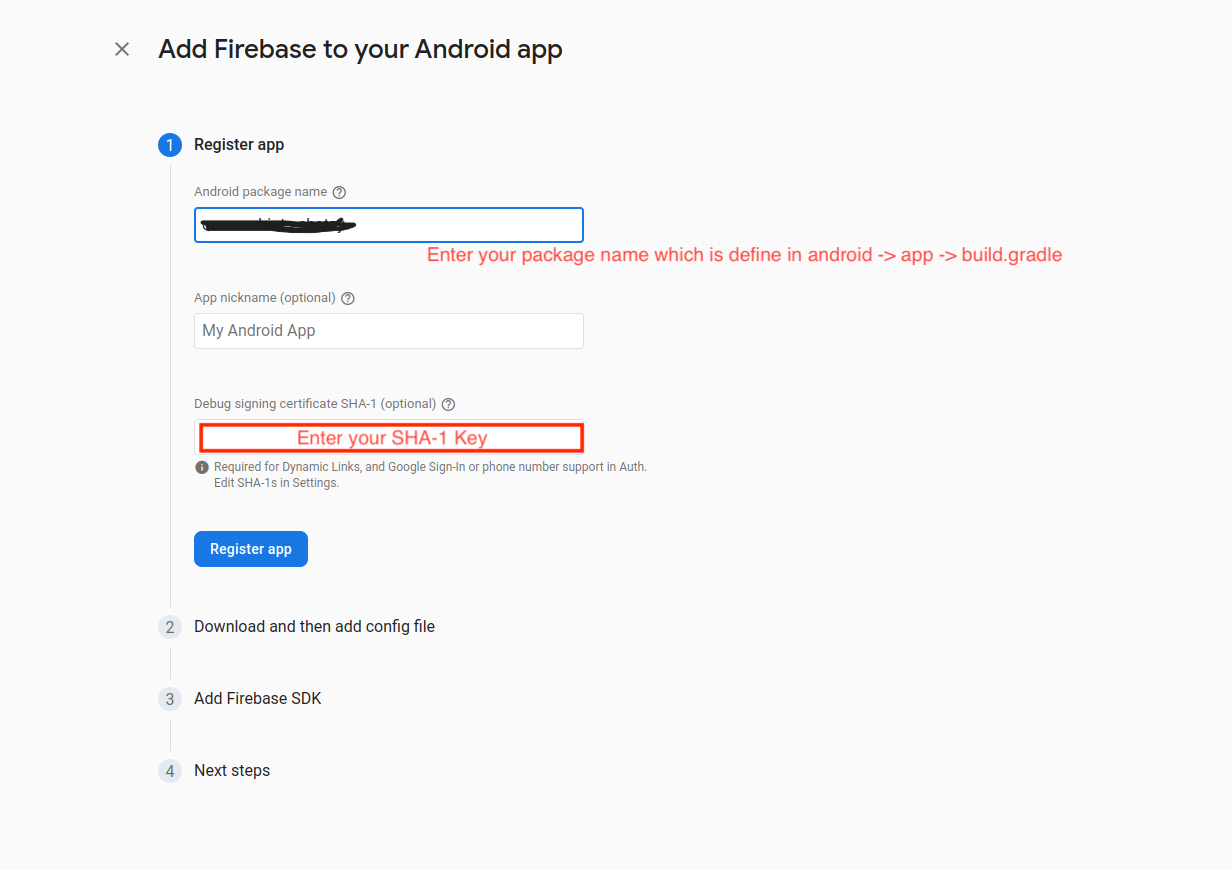
- Enter your app's package name in the Android package name field.
- Warning
- Make sure that you enter the ID that your app is actually using. You cannot add or modify this value after you register your app with your Firebase project. Both applicationId should be matched.
- Click Register app.
- If you haven’t Firebase Project Account ? Click here for create projet https://console.firebase.google.com/



Android :
- Select an Android app in the firebase console.
- Write project package name and SHA-1 Key.
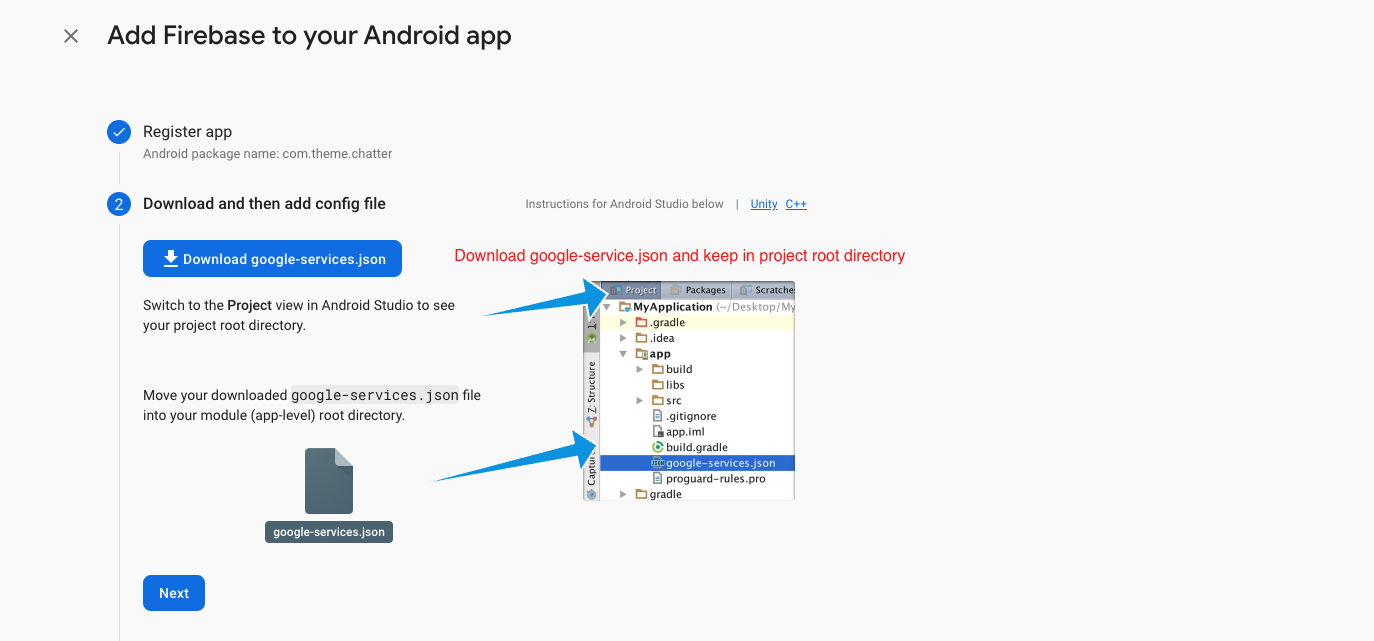
- Download google-service.json file and keep in project root directory
- Example Zyntra(Project Name) -> android -> app
- Replace the file in "android/app"
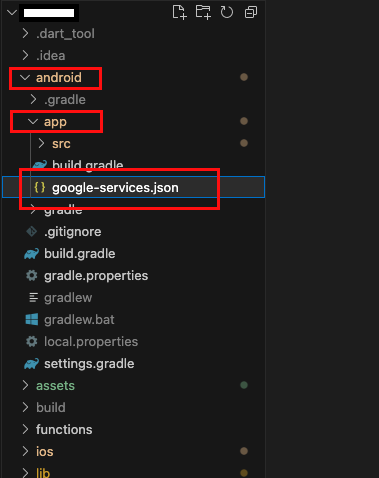
iOS:
- Create an IOS or Android click on Add app
- Select an iOS app in the firebase console.
- Write bundlid and APPID
- Download the Googleservice-info.plist file
- Replace the file in "ios/Runner/info.plist"
- Update "FirebaseApp.Configure()" in AppDelegate File


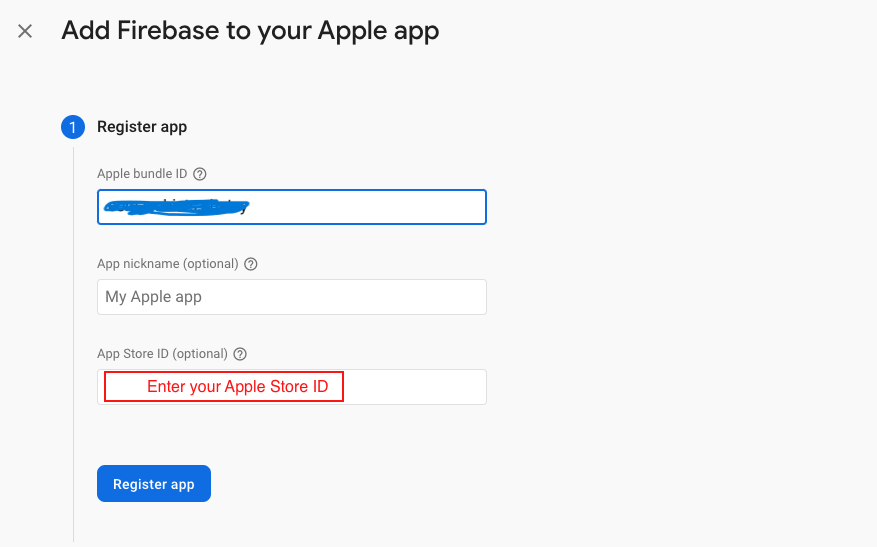
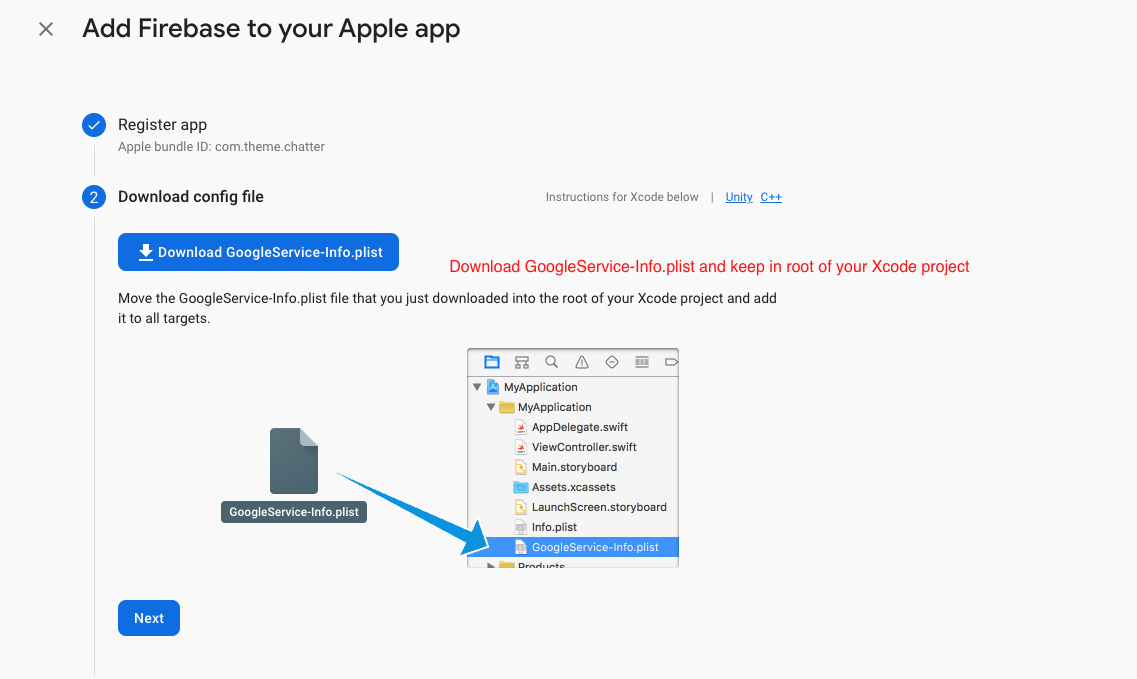
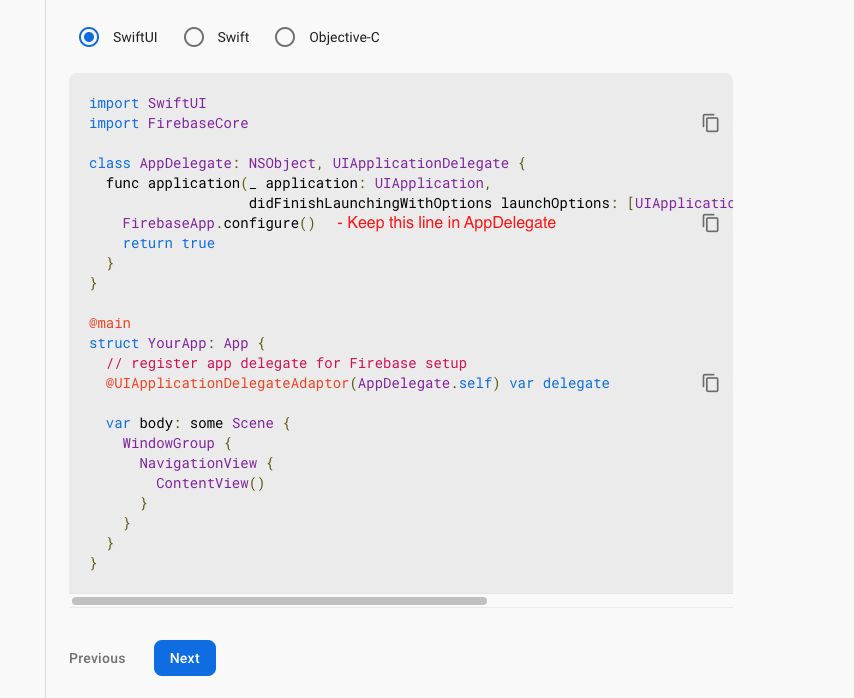
Firebase Rules:
For save data in Firebase storage and upload file,images,videos etc need to give permission
- On left hand side panel,go to build, select Firestore database.
- Click on Create Database.

- Then select mode wheather for live or debug mode need to use
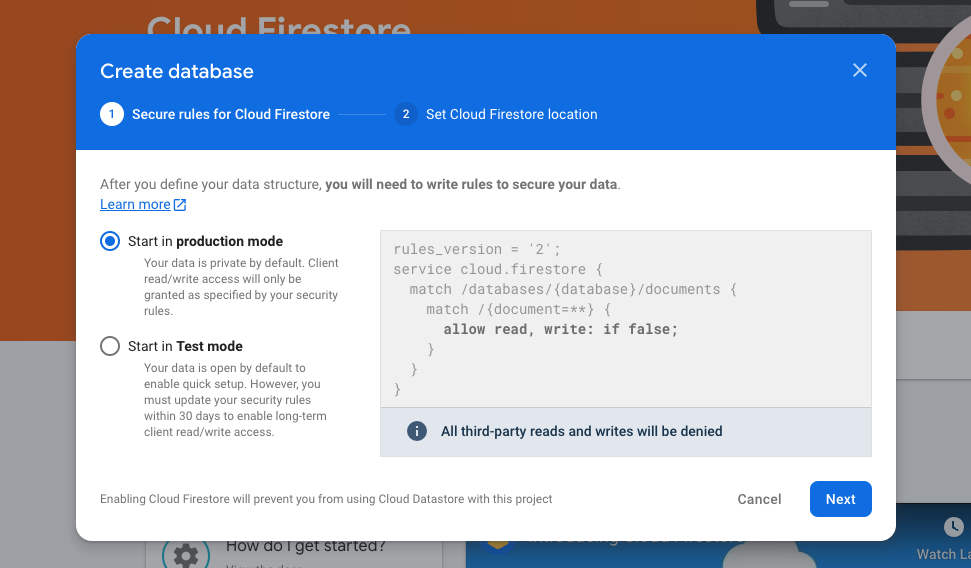
- Now click Rules tab

- Change condition by true
- After doing true click on publish button so that you can access database.

Firebase Collection:
As you have know there are multiple collection has been used in firebase. Let's see what is the use of the collection and how it added
Note: If any error occur regarding QuerySnapshot then check in firebase if missing any below Required config is missing if not then check there field and datatype and key word same to same as given in document
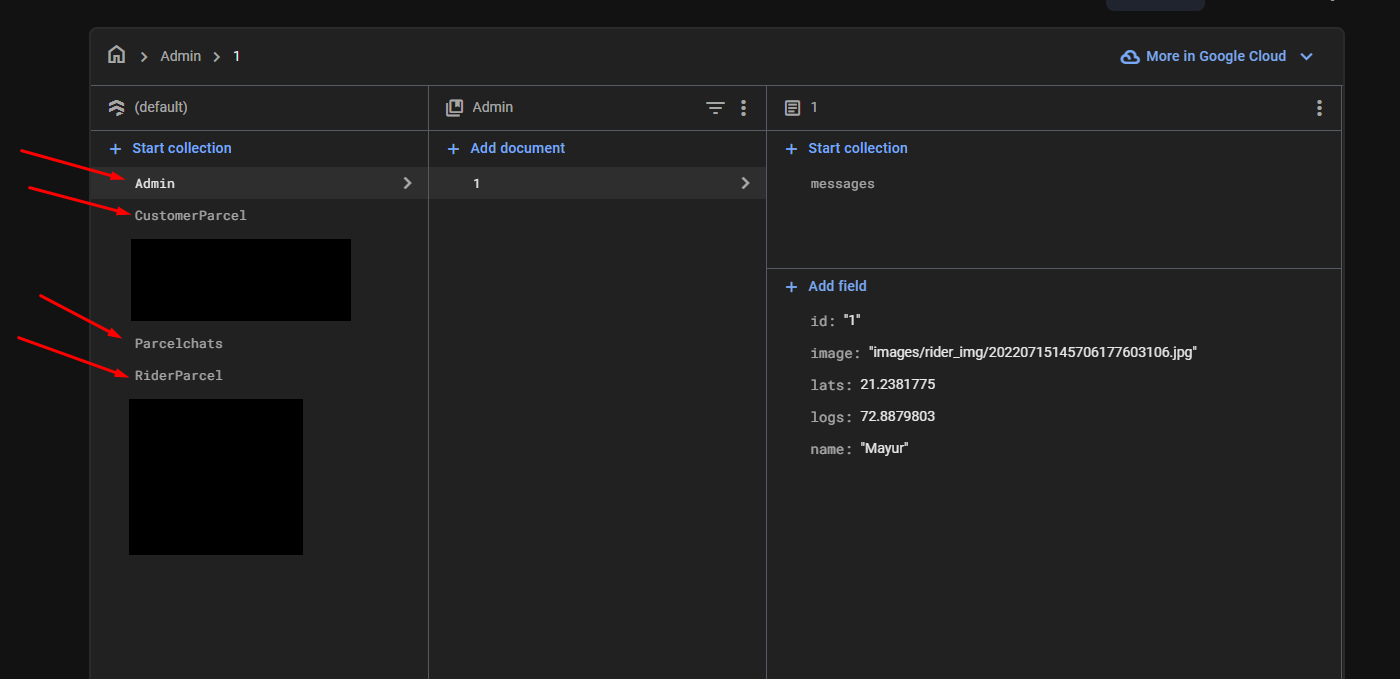
- NOTE :
- In above collection list [Auto generate] means this collections are generate in firebase whenever any first user enter any data . For other collections need to add manually in firebase. See the below 2 options for add collection data in firebase.
Firebase Cloud Messaging API (HTTP v1)
- 1. Create A Firebase Project

- 2. Now go to your Firebase project, On left hand side panel click on setting
icon. On click Setting button pop open open. In that click on Project
Settings

- 3. On the subsequent page, click Enable. You may need to wait a few minutes for the action to propagate to Firebase systems.

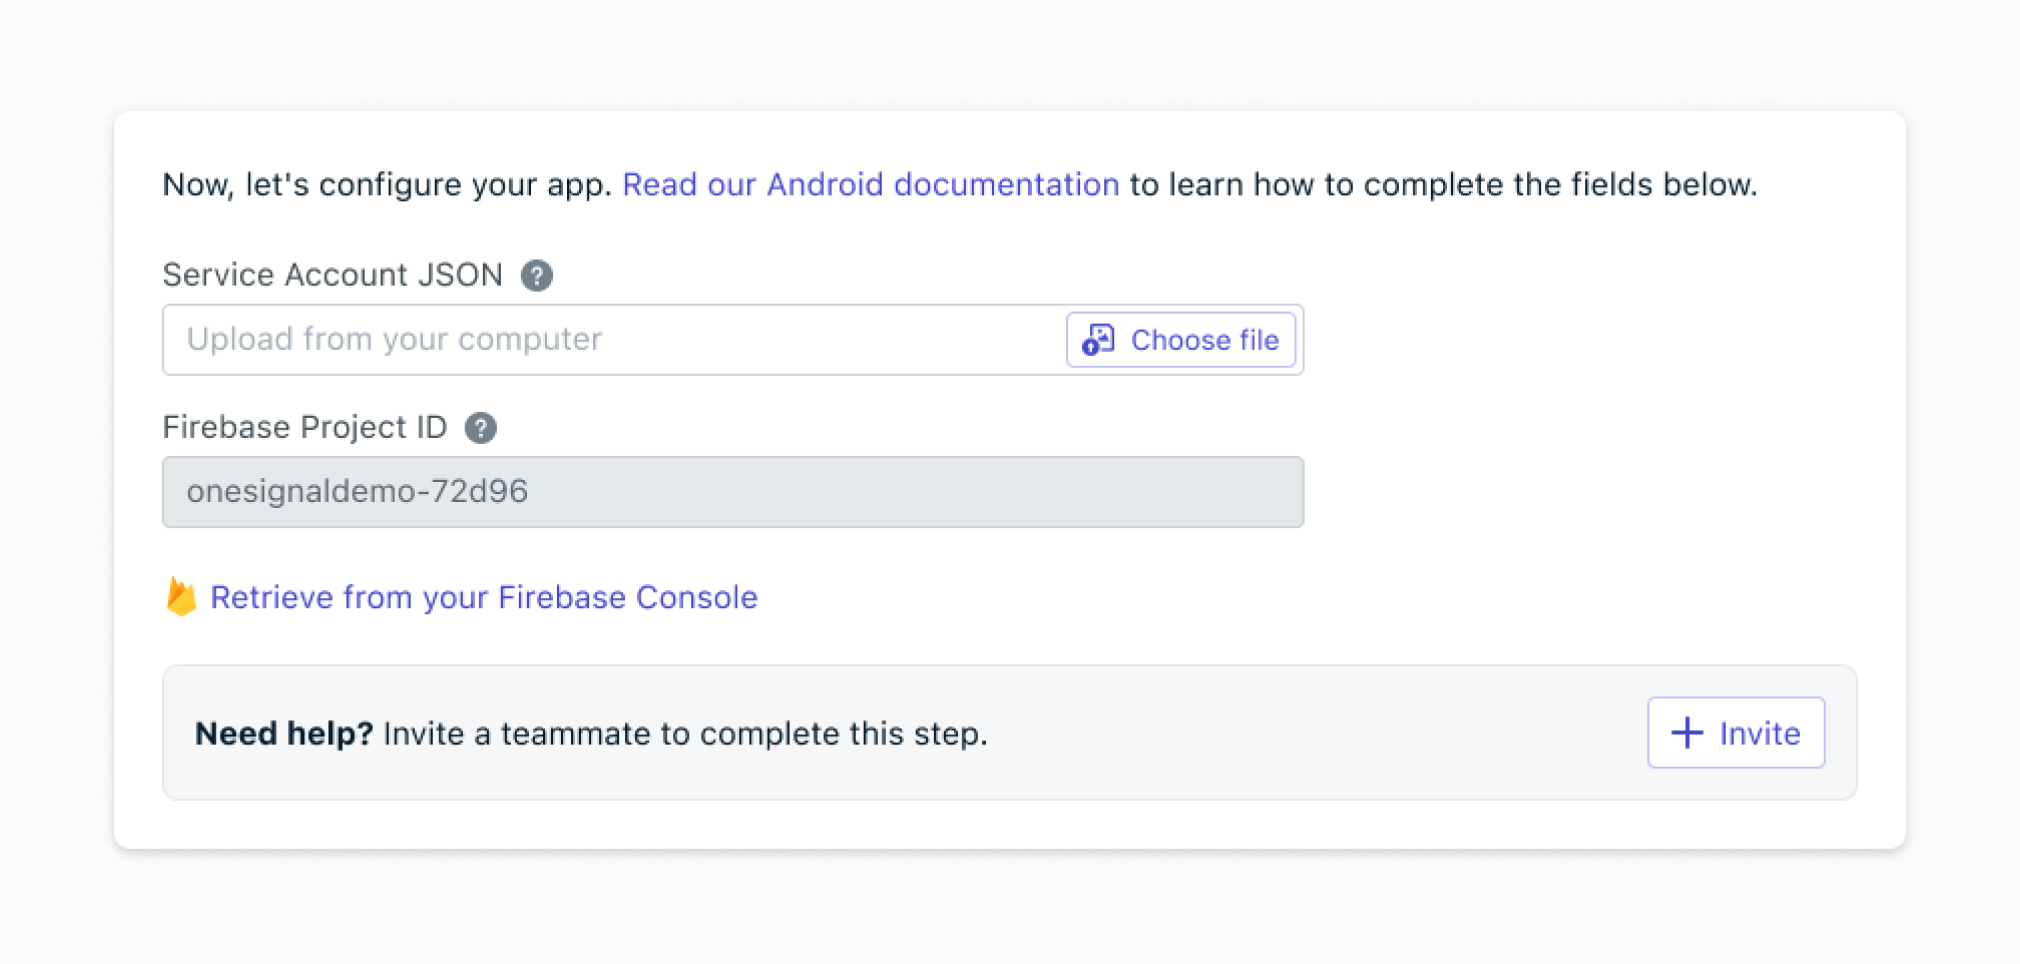
- 4. Generate a Private Key JSON file
In Project settings, go to the Service accounts tab.
Click Generate new private key at the bottom of the page.

- 5. You'll then see a warning window. Click Generate key.
Save the JSON file somewhere secure. You will need to access it shortly.

- 6. Please fill in all the details you received from the google-service.json file.

Firebase Cloud Messaging API (HTTP v1)
- 1. Create A Firebase Project

- 2. Now go to your Firebase project, On left hand side panel click on setting
icon. On click Setting button pop open open. In that click on Project
Settings

- 3. On the subsequent page, click Enable. You may need to wait a few minutes for the action to propagate to Firebase systems.

- 4. Generate a Private Key JSON file
In Project settings, go to the Service accounts tab.
Click Generate new private key at the bottom of the page.

- 5. You'll then see a warning window. Click Generate key.
Save the JSON file somewhere secure. You will need to access it shortly.

Twillo Configuration
Follow this link https://help.twilio.com/articles/14726256820123
- NOTE :
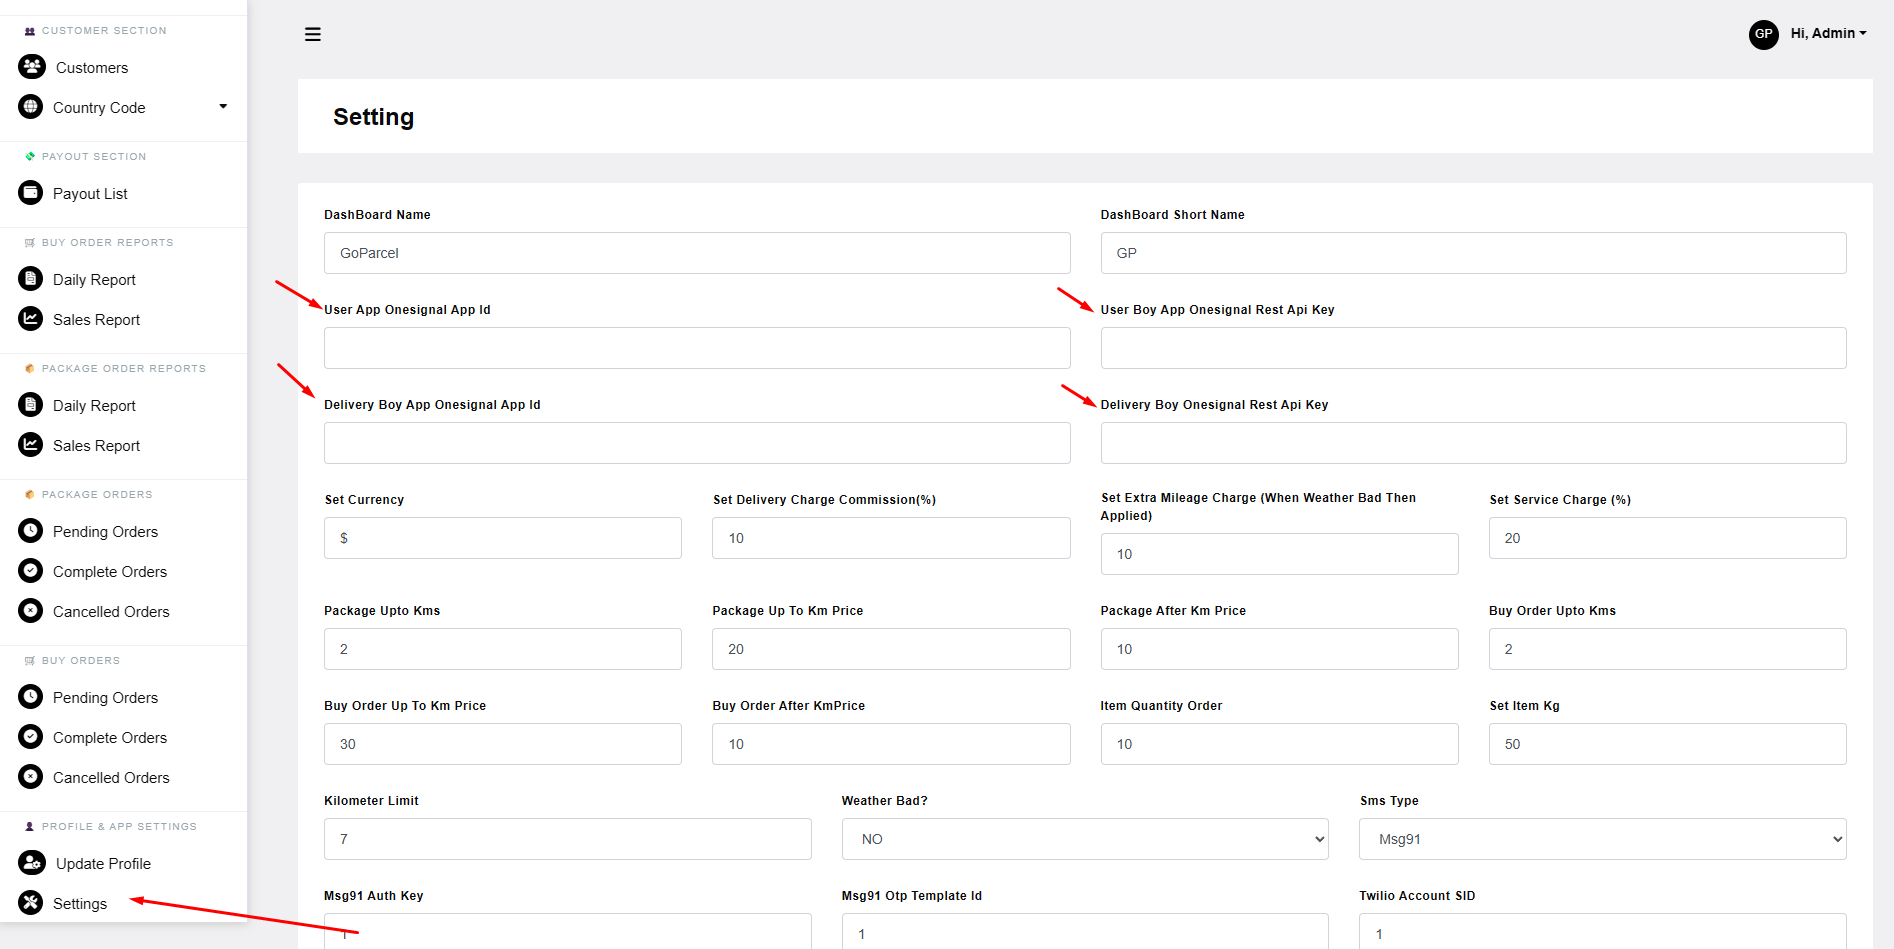
- Open Admin -> Goto Setting page -> Scroll Down and Add key
MSG91 Configuration
Follow this link https://msg91.com/help/where-can-i-find-my-authentication-key
Follow this link https://msg91.com/help/where-to-find-my-flow-id
- NOTE :
- Open Admin -> Goto Setting page -> Scroll Down and Add key
Add Google Map API Key
- 1. You need to generate the google API key. Visit this link - https://developers.google.com/maps/documentation/embed/get-api-key
- 2. You need to enabled mentione APIs: Direction API, Distance Matrix API, Geocoding API, Maps SDK for Android, Maps SDK for iOS, Place API.
- 3. You have to enable billing account. Visit this url for activating: https://support.google.com/googleapi/answer/6158867?hl=en
- 4. After generating API key, you have to put it on 3 different place for Android, iOS and web.
- NOTE :
- Android: App -> lib -> Api -> config.dart
- Android: App -> src -> main -> AndroidManifest.xml -> android:name="com.google.android.geo.API_KEY" android:value=“YOUR_MAP_API_KEY_HERE”/>
- iOS:
/iOS/Runner/AppDelegate.swift Add it after Bool { iOS: GMSServices.provideAPIKey("YOUR KEY HERE")
OneSignal Configuration
Create a OneSignal Account and Make 1 different projects inside for other apps must be create seprate project
One Signal is used for send the push notification into mobile or web. for more detail about OneSignal Documentation.
if you have own OneSignal then login and create project. if you does not then register account and create project
Follow below steps
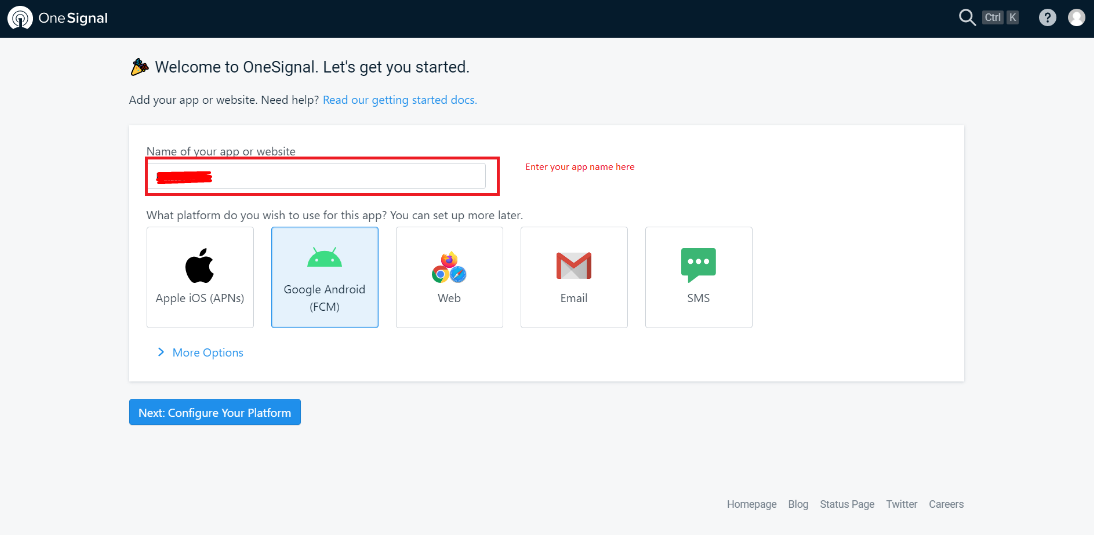
- Click in to New App/Website button.
- Enter the App/website name in AppName Field.
- Select one platform configure, for Example(iOS,Android,Web push).
- After Select Any One platform to configure. we can get Firebase Server Key and Firebase Sender Id. If you can select iOS platform then you can required the production Push Certificate.(.p12 Certificate) and then get Firebase server Key. Then Click on Save Button.
- After get Firebase Server key and Sender ID. Goto the firebase app and in left side you see Project overview and settings click on it and select Project Settings. and In Setting. select Cloud messaging. and Enter Server Key and Sender ID and at the end Click into Save Button.
Step 1: Create onesignal project in your account Choose android platform
Step 2: Click on Service Account JSON > Choose file and select the JSON file you downloaded from your service account. (Firebase Cloud Messaging API (HTTP v1) Step 4)
Step 3: Choose Target SDK as Flutter
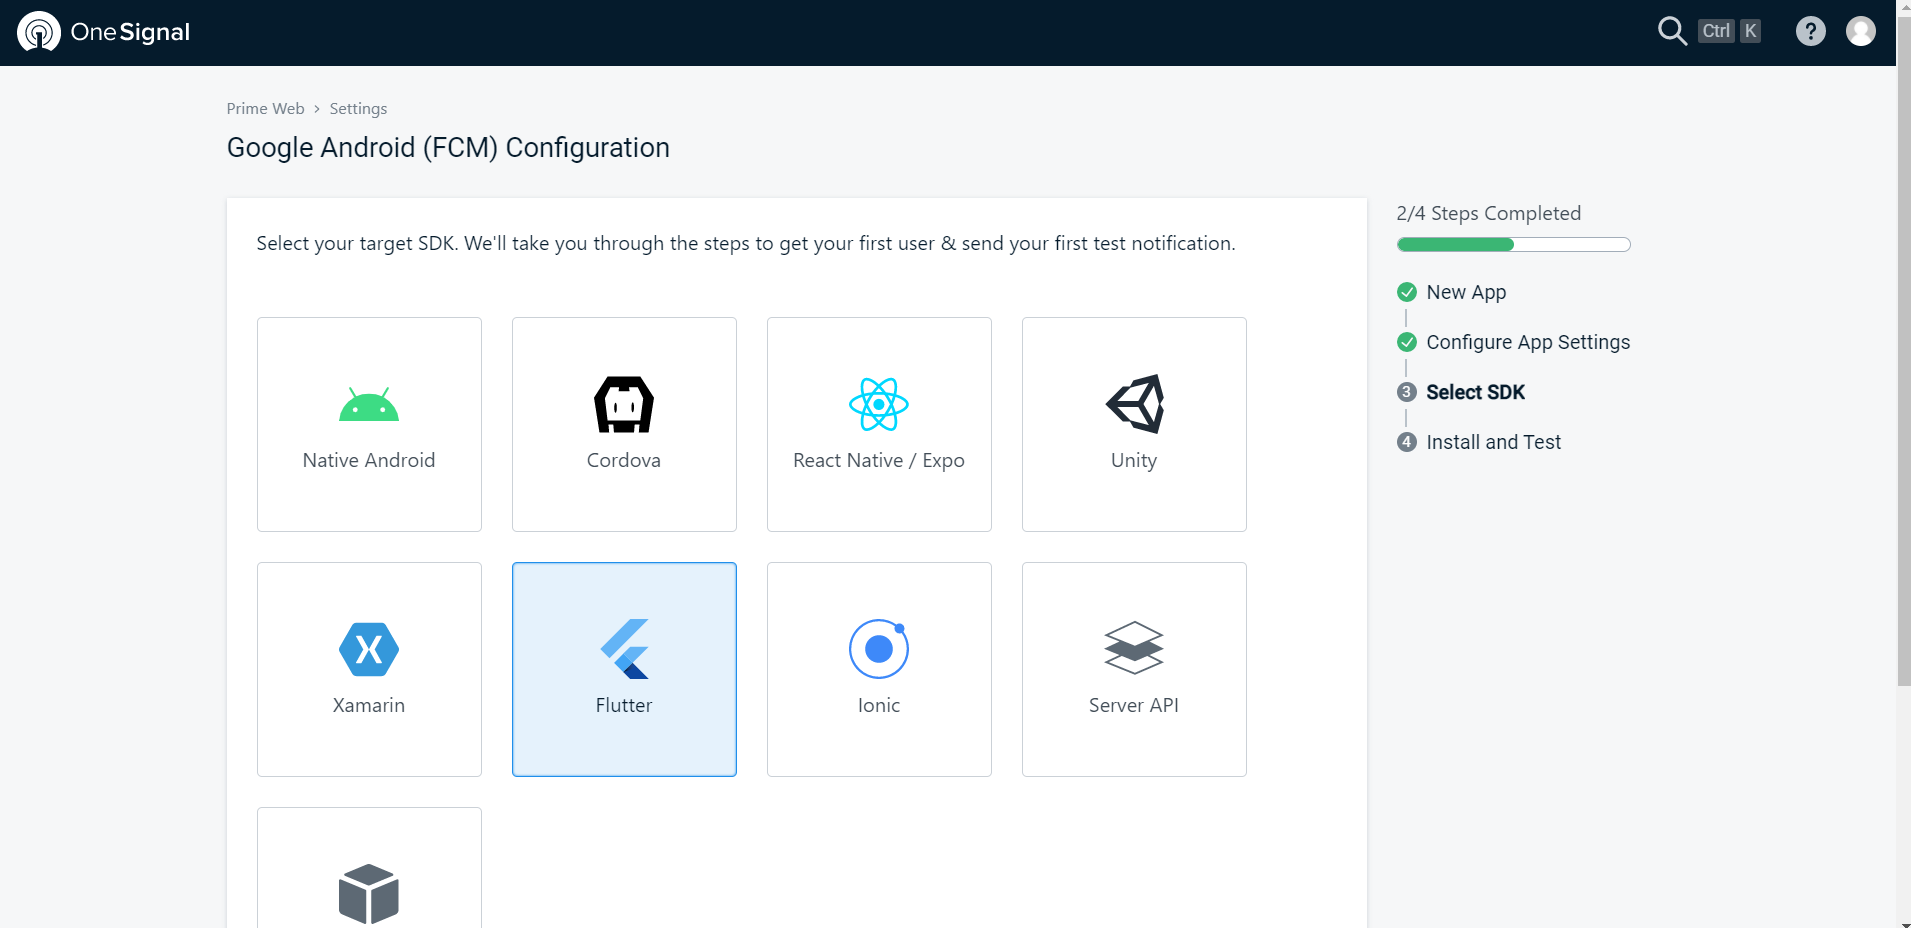
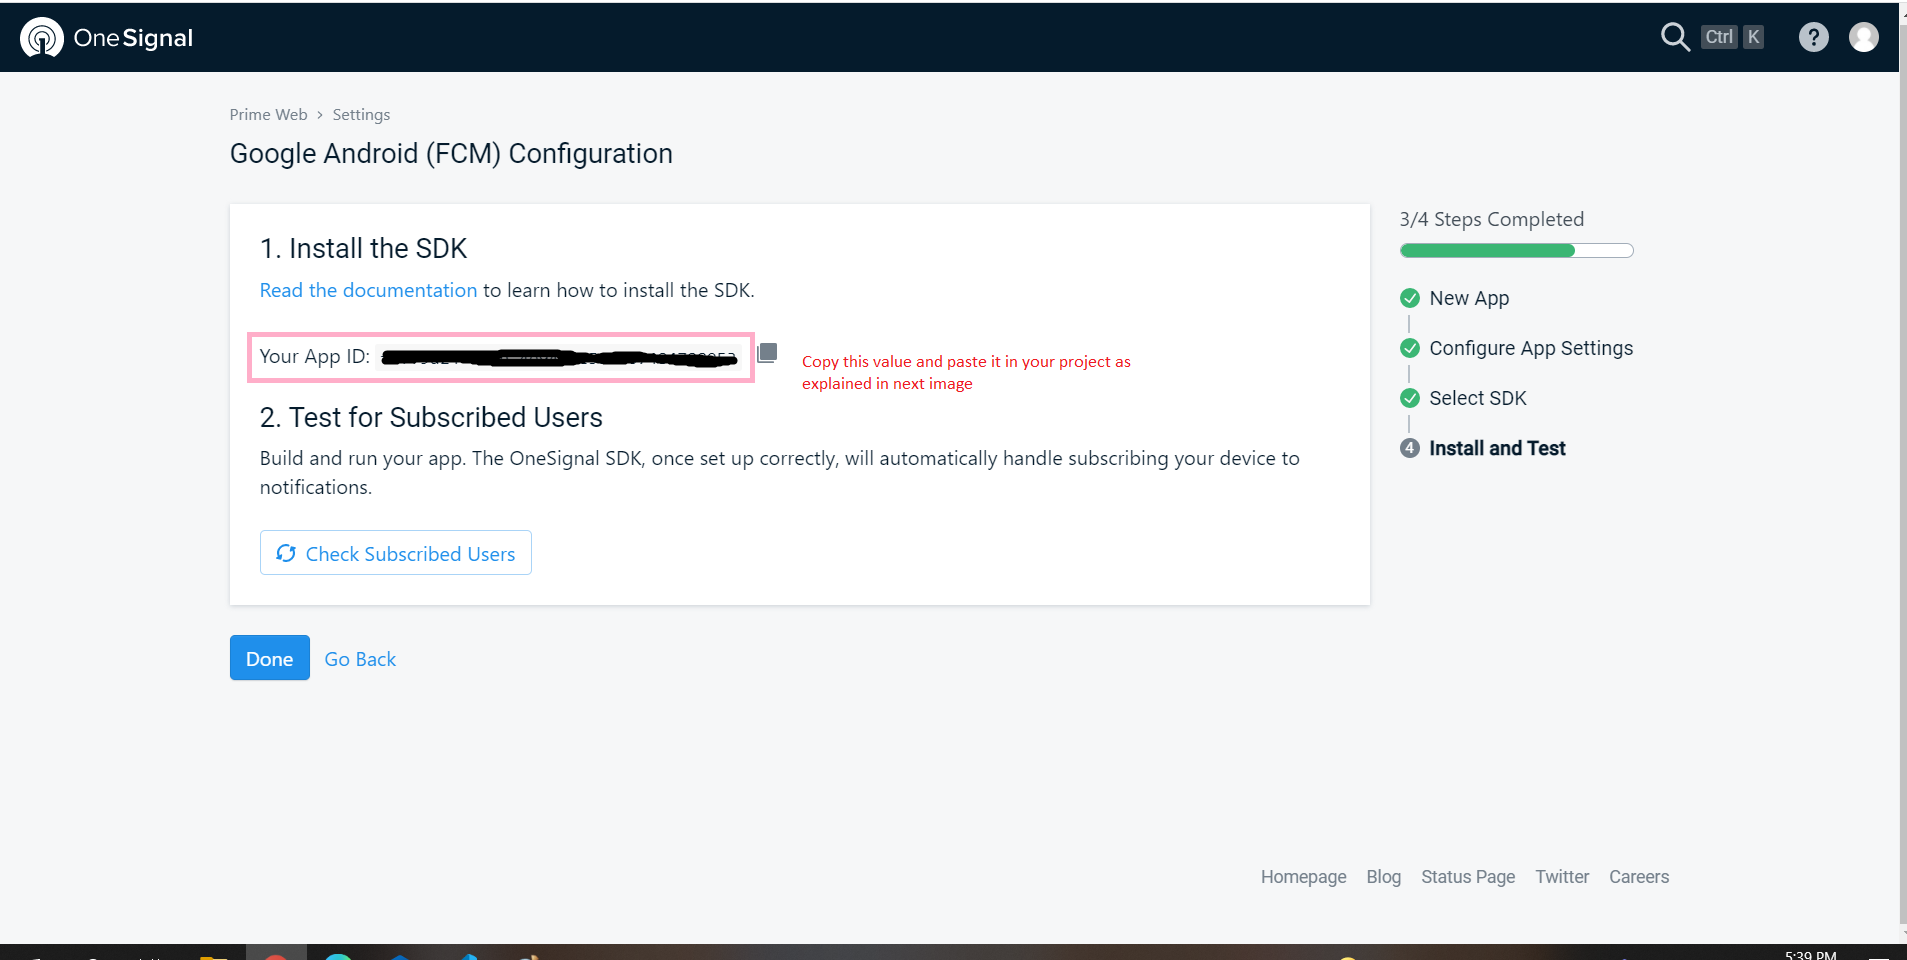
Step 4: Now copy App ID as shown below
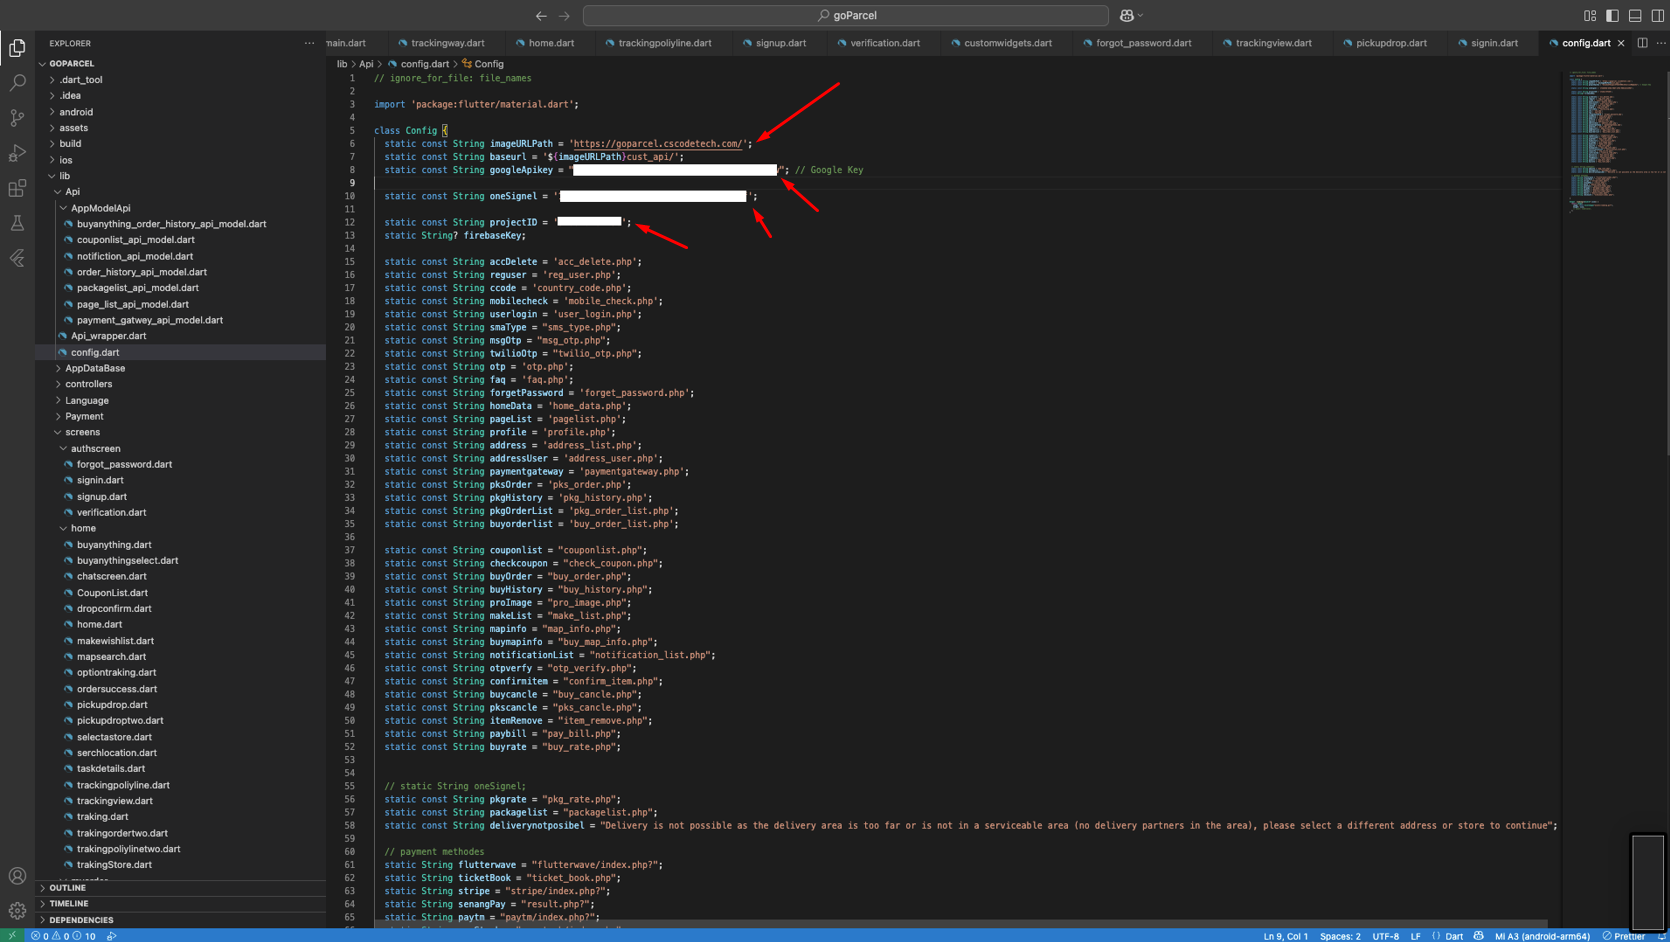
Step 5: Paste this App ID here
OneSignal.initalize("********************");
Step 6: If you didn't have copy app id before then you can get Onesignal App ID from this settings here and paste it to admin setting tab
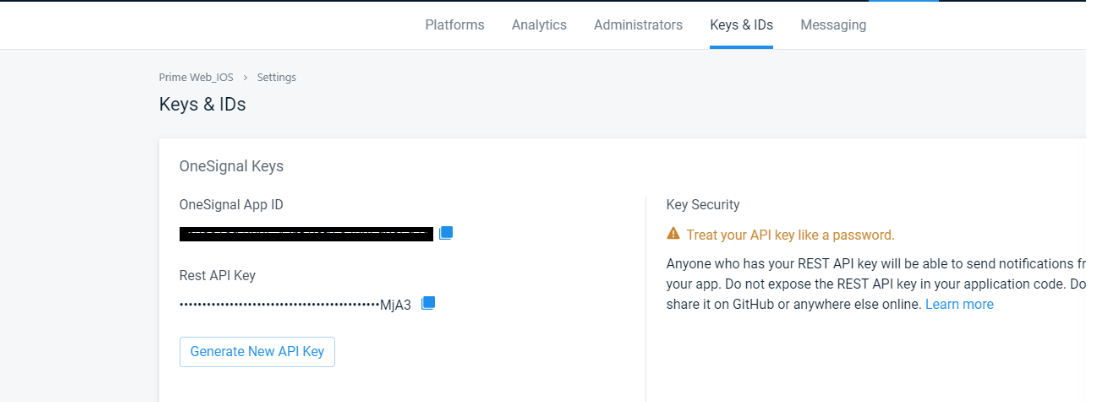
Step 7: Onesignal App ID & Rest Api Key paste it to admin setting tab
Note: Create the separate project for Firebase & Onesignal for following all the stpes
v1.0(24 July 2024)
No matching client found for package name
- The error is "package_name" in google-services.json is not matching with your "applicationId" in app gradle.
- Just make sure the package_name and applicationId both are same.
Flutter SDK Not Available
Download the SDK and point the SDK folder path in your future projects.
There are different sources you can try
- You can clone it from the Github Repository
- Download SDK zip file + extract it after downloading
- You can also Download any version(including older) from here (For Mac, Windows, Linux)
Authorization header not found
Message: Authorization header not found
Note: If you faced this error during development then this error due to header not set on your admin panel
Solution: Just check Enable JWT Authentication section wordpress document to resolve this issue
Expired token
Message: Expired token
This error occurs due to the Expired user token.Solution: Logout and re-login to your flutter app
Unsupported gradle version 7.*.*
Message: Unsupported gradle version 7.*.*
Solution:
1. Open project_root_directory/android in Android Studio
2. Wait for indexing
3. Now run your application from android module
Help & Support
We like to hear you out when you get stuck or encounter difficulty with our products. As soon as you buy one of our products – you can open a support ticket and share your concern right away. Microsoft Teams CSCODETECH or email: cscodetechuser@gmail.com
Support Policy:
It is recommended that before submitting a ticket you take a close look at product documentation (Docs folder in the archive you have downloaded from Themeforest/Codecanyon). To get technical support and assistance, you need to have a valid purchase code. You will find this when you SignIn your Codecanyon/Themeforest “Download” page. Click on the product’s download link.
Please Note:
Free support policy includes troubleshooting, technical assistance with the product only. It does not include any customization, additional features integration or concerns about third-party plugins compatibility. But, support is applied to plugin(s) we have developed and integrated ourselves. We appreciate your understanding!
You can expect answer within 24-48 hours, usually as soon as possible in the order they were received.
All support requests are being processed on business days (Monday to Friday) from 10:00 to 18:00 (IST +05.30). We are in IST +5:30 time zone. We address all the support queries 5 days weekly on the first-come, first-solve basis (Saturday, Sundays off).
We like getting positive feedback from our customers, and this is why we do our best to earn it! Write a review: https://codecanyon.net/downloads
Change Log
- Initial Release


